


Step 1: Set up your account or log in
The first step is to create your SingleKey account or log in if you already have one. If you’re new to SingleKey, start by completing a short form and provide some basic details about yourself and the type of rental property you manage.
Pro Tip: Before you can view the report, you’ll need to verify your identity by uploading a picture of yourself and a piece of government-issued identification. Ensure you enter your name exactly as it appears on your identification.
Once you’ve signed in, select “Tenant reports” in the top menu. Then, click the “Order new report” button to reach the page where you can order your report.

Step 2: Invite a tenant or enter the tenant’s information
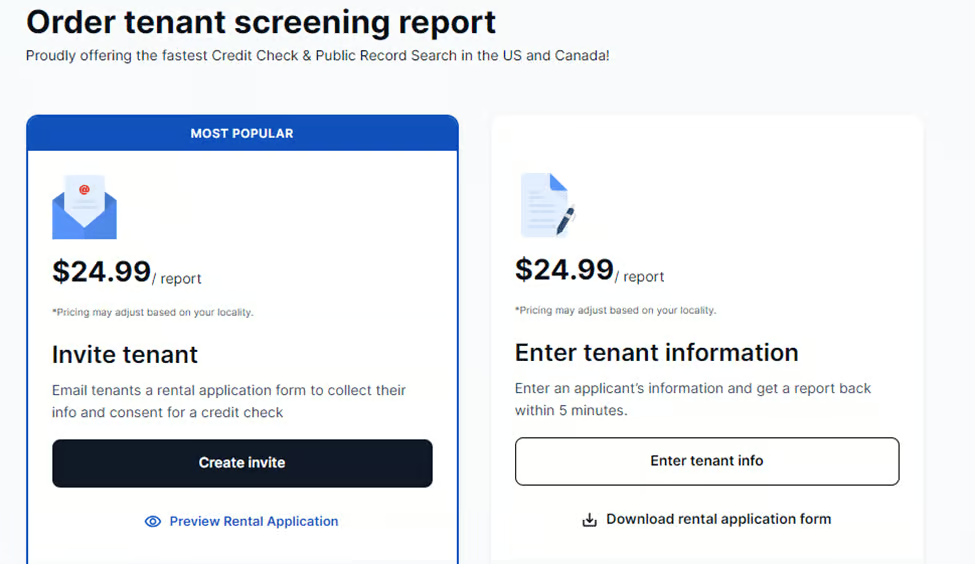
Next, you must provide a few basic details about the applicant. You can do so in two ways:
Under this option, the applicant receives an email with a request to complete a rental application form. It’s a good choice if you’ve yet to collect their personal information (e.g., name, current address, and phone number). It’s also ideal if the applicant will be the one paying for the cost of the report. Once you complete this step, SingleKey will email the applicant a link to the application form to collect the required details and consent to credit and background check.
To get started, click the “Create invite” button.
A new page will appear where you must provide the applicant’s name and email address. Adding their phone number is optional, but including this detail can help improve the report’s accuracy.
If multiple individuals are applying to be your tenant, you can add their details by clicking the “Add another applicant” button.

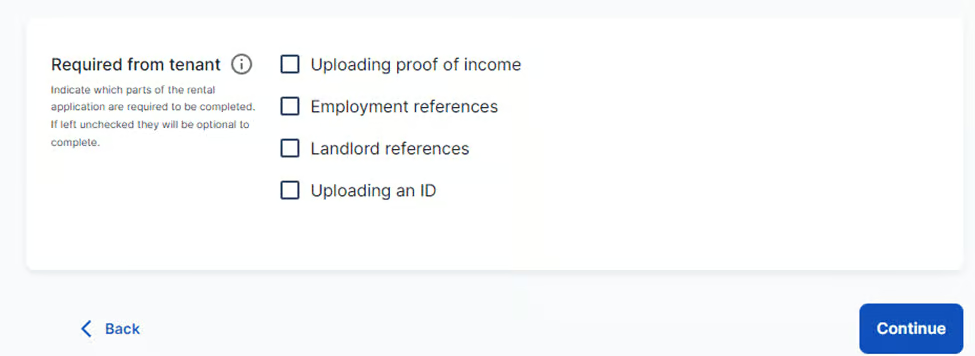
Next, you can specify which part of the rental application must be completed by checking the applicable box. You can require the applicant to provide proof of income (such as a pay stub or bank statement), employment references, landlord references, and government issued ID.
Next, by checking the applicable box, you can specify additional information the potential tenant must submit when completing the application:
- Proof of income (such as a pay stub or bank statement)
- Employment references
- landlord references
- government-issued government-issued
Once done, click the “Continue” button, which will take you to the page below:
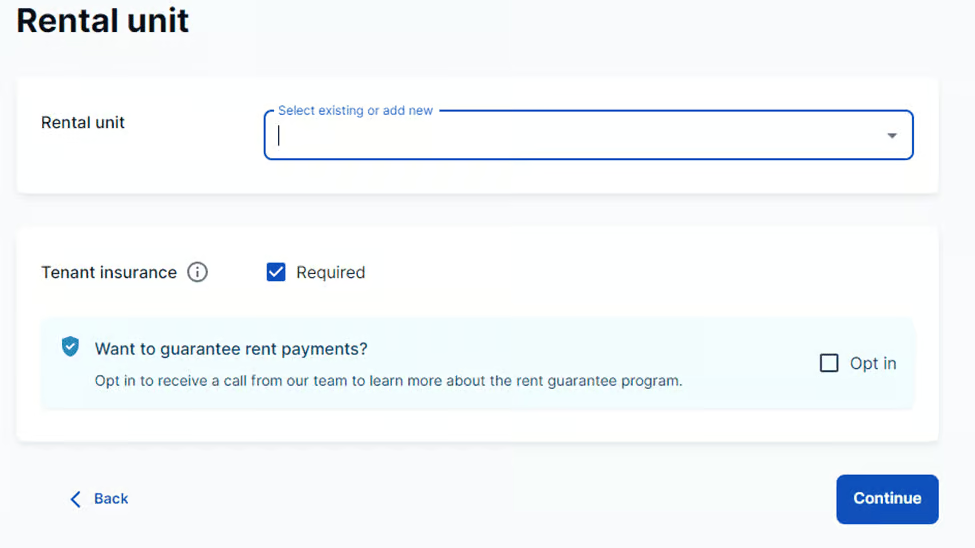
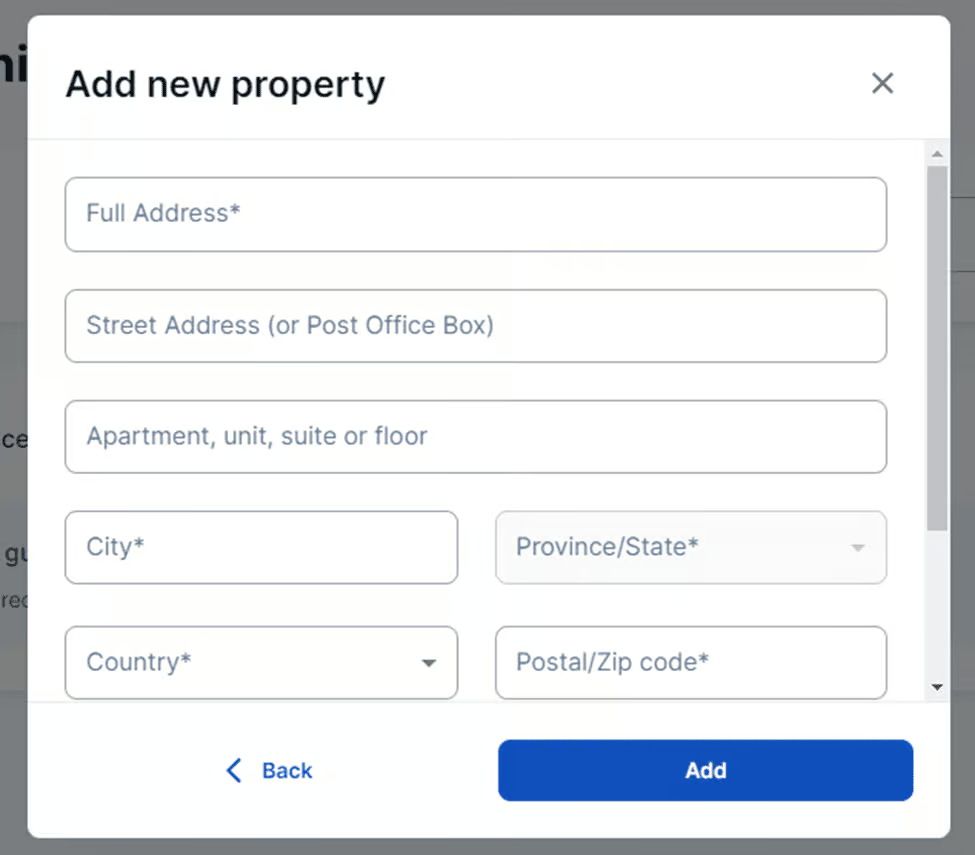
In this section, you’ll need to enter the address of your rental property. Click on the down arrow in the “Rental unit” field and select “Add new property,” which will open a new window where you can enter your address, monthly rent, and the date the property is available. Once you’ve completed this form, click “Add.”
If you already have your rental set up in SingleKey’s platform, click the down arrow to select it. However, you can still edit the existing details if needed.
After adding your property’s address, you can request the applicant to obtain tenant insurance if desired. You can also sign up to learn about SingleKey’s Rent Guarantee by checking the “Opt-in” box. Once finished, click the “Continue” button, which will take you to the check out page.
This method is ideal if you’ve already obtained the applicant’s personal information. You can enter the details directly into SingleKey’s platform and receive your report within five minutes.
To get started, click the “Enter tenant info” button.
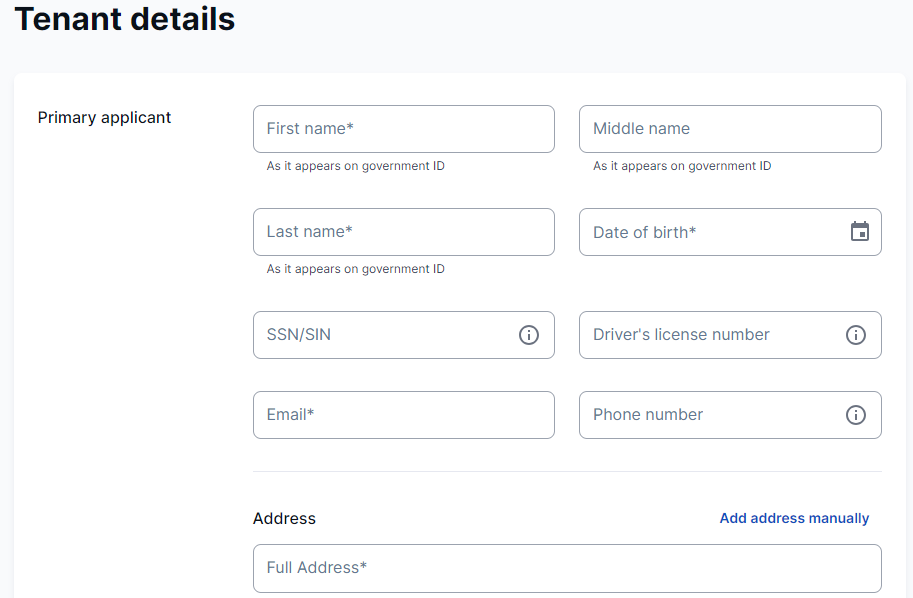
A page will appear where you must enter the applicant’s first name, date of birth, current address, and SSN (for US applicants).
While not mandatory, you can also provide their driver’s license number, phone number, and SIN (for Canadian applicants). Including these extra details will improve SingleKey’s ability to collect accurate information about the tenant.
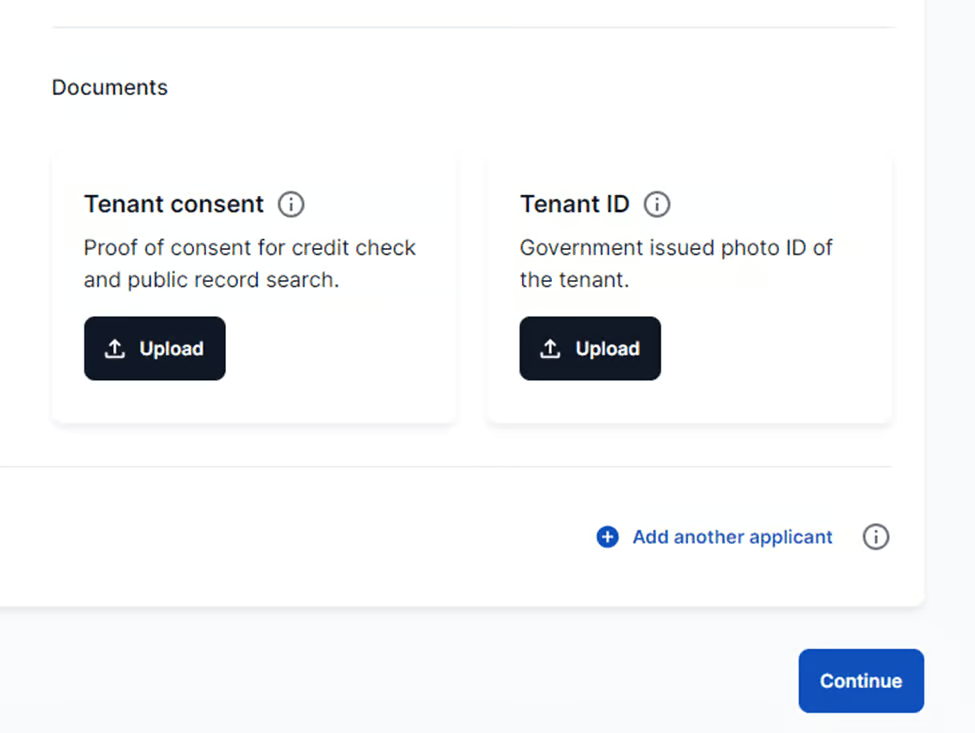
Directly below, you can upload the applicant’s consent for a credit and background check and a copy of their government-issued photo ID. If you need to add details for additional applicants, click “Add another applicant.”
Once you’re finished, click the “Continue” button.
The next page is where you enter your rental unit’s address. Use the drop-down arrow in the “Rental unit” field to select an existing property or click “Add another property” to add a new one.
If you choose the latter option, the window below will appear where you can provide the full address, plus the monthly rent and date of availability. Click the “Add” button to close the window once you’re finished.
On this page, you can also request that the applicant purchase tenant insurance and sign up to learn about SingleKey’s Rent Guarantee.
Click the “Continue” button once you’ve entered all the necessary information, which will take you to the checkout page.
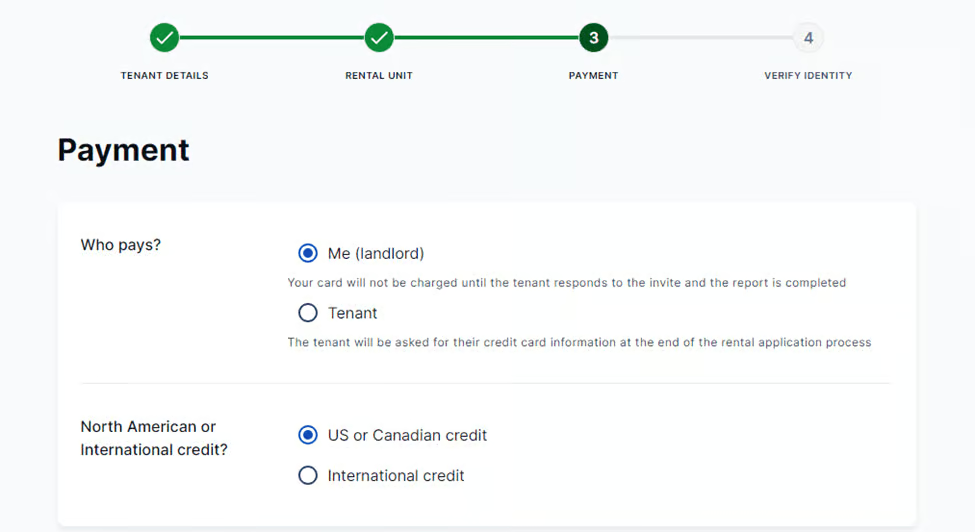
Step 3: Pay for the report
Now that you’ve supplied all the information SingleKey needs to assemble your Tenant Report, the next step is to pay for your order.
If you invite the applicant to fill out the rental form, you’ll need to specify who will pay for the report. You’ll also need to choose whether you’re ordering a US/Canadian credit report or an international one.
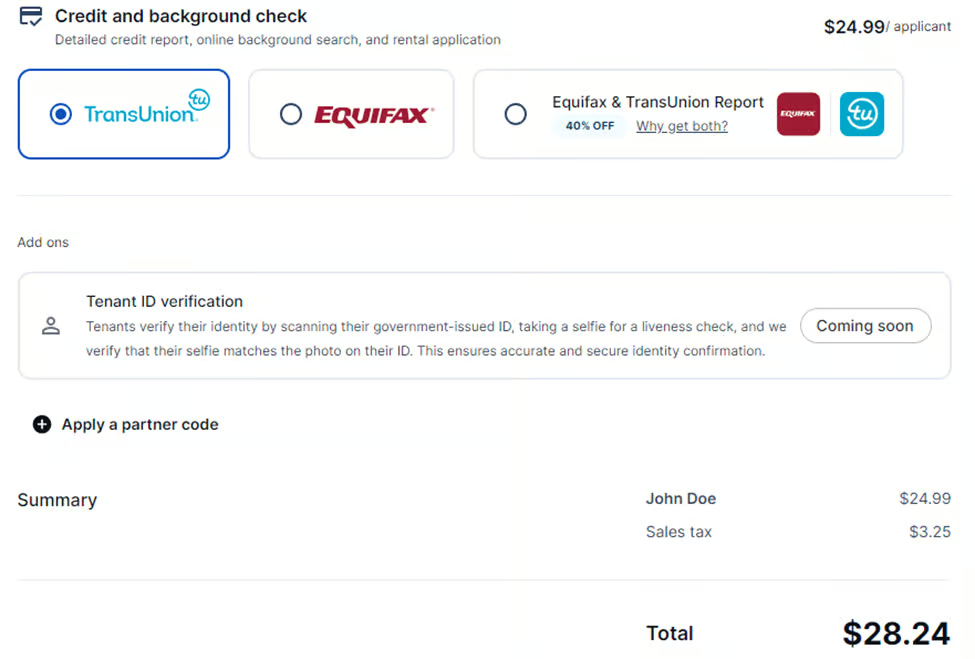
If you select the U.S. or Canadian credit option, you can choose between TransUnion and Equifax as the credit report provider. Alternatively, you can order a report from both at a discounted rate.
The partner code field is optional and applicable only if you received a promotional code to get a discount on your purchase.
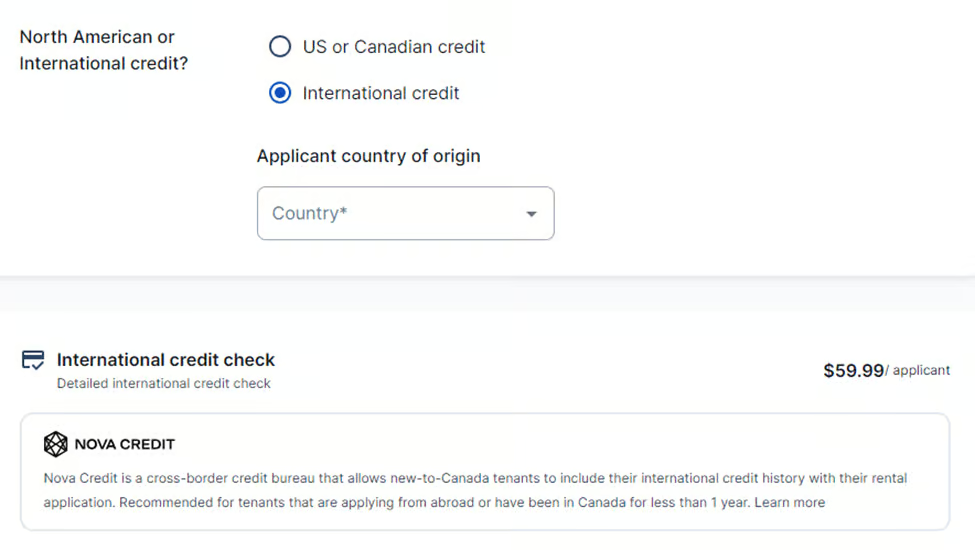
Suppose you choose the international credit option (only available if you the tenant completes the info themselves). In that case, a drop-down box will appear where you can select the applicant’s country of origin. SingleKey has partnered with Nova Credit to help you securely access an applicant’s foreign credit history. Learn more about screening international tenants.
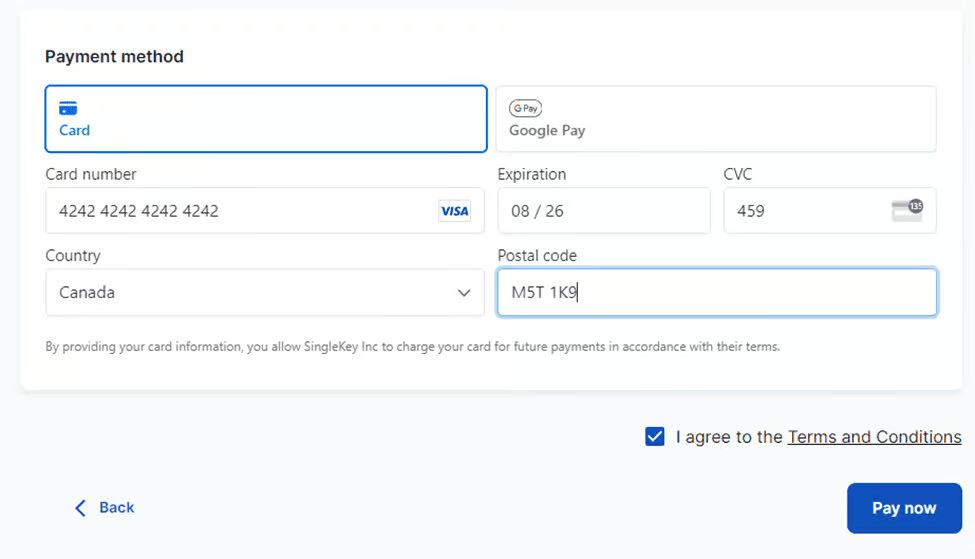
Next, enter your payment information and agree to the terms and conditions. You can purchase your Tenant Report using a credit card or Google Pay. Click the “Pay now” button to complete your transaction.
Step 4: Receive your report
After completing your payment, you’ll need to verify your identity before receiving your report. To access it, log into your SingleKey account and go to the “Tenant reports” page. From here, you can view and download a copy of the report.
Suppose you invited your applicant to provide the required information to generate the report. In that case, you’ll need to wait for them to complete and submit the application form. Once they’ve done so, your report will appear under the “Tenant reports” page.
With all the necessary details in one report, you can now learn what valuable insights you can gain from each part of SingleKey’s Tenant Report.

Our final thoughts
With the right tenant screening service, you can quickly access the information you need to evaluate rental applicants confidently. SingleKey makes tenant screening easy, providing information landlords can trust when searching for the perfect tenant.