


Renovating your rental property is one of the best ways to ensure it remains competitive in the rental market – and earn you a hefty profit for years to come. A well-thought-out renovation can help you attract higher-quality tenants, reduce your operating costs, allow you to charge a higher rent price, and even boost your rental’s value.
However, a rental property renovation can be tricky to execute, especially if you lack the knowledge and expertise to do it yourself.
As with most things, there’s a right and wrong way to approach a renovation project. In this detailed guide, we’ll explore:
- The critical decisions to make before you begin your project
- Which areas of your rental to prioritize to maximize your return on investment
- How to keep your costs low and choose materials that will last for many years without the need for replacement
- When and why you should hire a general contractor to get the job done
Let’s begin!

Chapter 1: What to consider before you begin your renovation project
A concrete plan is crucial before making your first trip to the hardware store. With the right strategy, you’ll have a firm grasp of your renovation’s goals and constraints, allowing you to tackle the project with fewer obstacles and sleepless nights.
Home renovation vs rental renovation
Have you recently revamped your home? If so, you may have to recalibrate your mindset before tackling a rental renovation.
A significant difference between a home renovation and a rental renovation is you have the freedom to commit more time, money, and your unique preferences, to the former.
With a rental renovation, the goal is to ensure your property meets modern standards to be a contender in the rental market – nothing more. So always view each aspect of the renovation strictly as a business decision.
Ask yourself the following: will doing this produce an adequate return on my investment? Will renters respond favourably to how I’ve transformed the property?
Tenant considerations
Brainstorm a list of things the average tenant would find desirable in a rental unit. By doing so, you can concentrate your efforts on aspects of your rental that genuinely matter and will net you a healthy return on your time and money.
While catering to the everyday tenant is fine, you may need to narrow your focus if you rent exclusively to a specific demographic. For example, a first-year college student’s preferences and needs will differ from a family with young children.
It’s also prudent to be conscious of the type of neighbourhood your rental is located in, including the level of affluence and nearby amenities. The location may dictate the kind of renters you attract and their expectations.
Budgeting
Determining how much you want to spend is critical to a successful and profitable renovation. Over-the-top spending can put a severe dent in your rental business’ bottom line.
As a result, it’s essential to determine how much you can reasonably spend. By knowing your financial constraints, you can make wiser renovation choices by asking yourself critical questions like the following:
- What rooms in the rental unit deserve the most attention?
- Is it worth installing new kitchen cabinets or just repainting the existing ones?
- Are there things that can be repaired rather than replaced?
- Are there ways to save money by using cheaper materials that are still durable and long-lasting?

Size and scope
Your budget will dictate the size and scope of your renovation. How much work do you anticipate doing to enhance your rental property? Do you foresee only painting and minor upgrades to faucets, light fixtures, and handles? Or do you envision a full-scale renovation that necessitates completely gutting entire rooms?
Are you struggling to choose where to focus your energy and money? If so, the safest bet is to concentrate on areas of your rental that will produce the greatest return on investment. Then, you can dedicate your remaining funds to touch-ups and cosmetic upgrades. We’ll discuss some of these in chapter two of this guide.
Rules and regulations
Observing your local and provincial housing authorities’ regulations governing property renovations is crucial. You don’t want to break any laws and risk paying a hefty fine or becoming embroiled in a lawsuit with a tenant.
If you currently have a tenant living in your rental, inform them about the remodelling work you plan to do and what the job will entail. You can ask for their input and preferences, too. For example, you can have them choose the colour for the walls.
To complete a large-scale renovation, you may temporarily have to evict your tenant from the property. In that case, the law requires you to give your tenant a written notice, anywhere from a few months to a year in advance.
However, in some jurisdictions, evictions associated with renovations are more challenging to carry out or prohibited entirely. In the latter case, it’s preferable to speak with your tenant and devise an alternative solution to eviction (such as providing them with temporary accommodation elsewhere).
Here are some examples of eviction rules that pertain to rental renovations.
- In Ontario, you must give your tenant a minimum of 120 days’ notice using the N13 Form
- In Alberta, you must provide your tenant with one year’s notice.
- In Quebec, it’s illegal to evict a tenant to do renovations.
- In British Columbia, you must apply for an Order of Possession from the Residential Tenancy Branch to evict your tenant.
Sometimes, the tenant can safely remain in the rental while the renovation occurs. But the project could still be disruptive to their daily lives. As a result, be open about what they can expect regarding noise, access to the premises, the project duration, etc.
By law, you must reasonably minimize the disruption and interference to the tenant under the common law principle of quiet enjoyment.
Permits
Depending on the nature of your renovation, you may need one or more permits from your municipality before carrying out the project. Your rental must meet basic requirements for health and safety, fire protection, and electrical standards and comply with zoning bylaws.
Generally, a permit is necessary if your renovation project entails altering the structure of your property or its internal systems. Examples include:
- Adding new windows.
- Installing a fireplace.
- Converting your basement into another rental space.
- Upgrading the plumbing system
You can find details about various permits by visiting your municipality’s website and navigating to the page that relates to property development. Below are links that outline building permits for some of Canada’s major cities:

Chapter 2: Best Renovations for your rental property
It’s wise to dedicate your time and money only to upgrades that will net you a solid return on your investment while avoiding those that add little or no value. Below are some of the best renovations you can perform on your rental property.
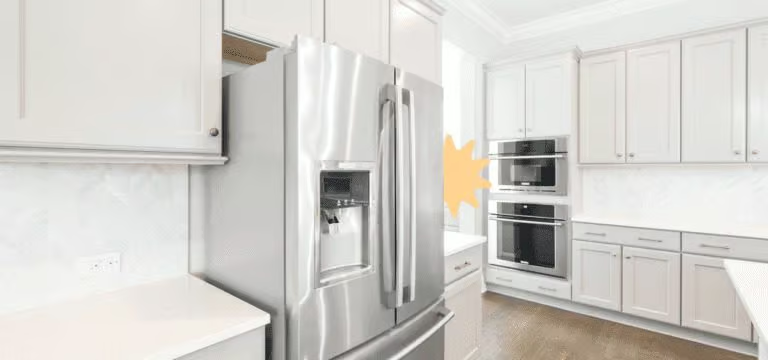
Remodel the kitchen
If one room in our rental is worthy of your attention, it’s the kitchen. It’s the area that renters will likely scrutinize the most closely and judge the most harshly.
Renovating your kitchen is arguably the most worthwhile home improvement project you can undertake, with a potential 20% return on investment.
However, a kitchen overhaul can quickly devour your renovation budget (and then some). According to Homestars, you can expect to pay between $19,500 and $52,000 to revamp a medium-sized kitchen. And the price tag for an upscale renovation for a large kitchen can reach close to six figures.
Luckily, you don’t need to spend a small fortune to yield a solid return on your investment. Quick cosmetic fixes and other modest upgrades can have a massive impact on how tenants perceive your kitchen.
For example, repaint and add trim and new handles to the cabinets rather than replace them, as they’re usually the costliest portion of a kitchen renovation. Add some fashionable light fixtures, a discreet backsplash, a shiny new faucet, a sturdy countertop, and some new appliances, and you’re good to go.
Upgrade the bathroom
Next to the kitchen, the bathroom is typically the other room renters will evaluate strongly, so this is another area to prioritize.
Start with the noticeable improvements, such as replacing the toilet, or only the seat, if need be. Upgrading the faucet and shower head is also wise, as is replacing the sink.
Next, consider the size and functionality of the bathroom. Is there enough storage room for towels, soap, and other items? Can it accommodate multiple people (assuming it’s the only bathroom in your rental)?
If not, you can add more shelving units and install a second vanity. Replacing the bathtub with a walk-in shower can is a great way to maximize space, especially if your bathroom is small and crowded.
Enhance the exterior
Never underestimate how your rental presents itself on the outside. Your rental may look sleek and stylish on the inside, but if the exterior is dirty, messy, and worn-down, it could be enough to dissuade renters from applying for a lease.
If your rental’s exterior has seen better days, it’s time to revitalize it. As with the interior, start with simple fixes and upgrades:
- Clear out the weeds.
- Trim the grass, trees, and shrubs.
- Upgrade your walkway with new pavers, bricks, gravel, or the material of your choice.
- Apply a fresh coat of paint throughout your rental’s exterior or at least power wash it.
Feel free to add some greenery to embellish your property’s exterior, such as flower beds, planter boxes, and shrubs. Just remember to keep things simple, so your tenants aren’t overwhelmed with maintaining the landscaping.
Revitalize the floors
Flooring can significantly affect how your rental property appeals to tenants. After all, they’ll be walking over it daily, so they’ll notice!
Suppose your rental property is currently covered in carpet. In that case, it’s a good idea to tear it out and replace it with a more durable and attractive flooring option.
Carpet is unappealing to many tenants and has declined in popularity over the years. While it’s a warm and cozy material when brand new, it easily traps dust and dirt, making it harder to clean over time.
Hardwood is often touted as the material of choice for floors, as it’s easy to maintain, long-lasting (up to 25 years), and exudes elegance. However, it’s also one of the priciest flooring options around. Plus, it’s prone to water damage.
A much less expensive alternative is luxury vinyl plank. This material is durable (can last 10 to 20 years), waterproof, and requires little maintenance.
Add popular amenities
Incorporating sought-after amenities is a great way to make your rental property stand out from the competition. The right amenities can enhance your tenant’s quality of life, making their stay more comfortable and convenient.
Here are some amenities to consider as part of your renovation.
- Washer and dryer unit. It’s safe to say most people would rather avoid taking constant trips to the laundromat to clean their clothes. Save your tenant’s the hassle of doing so by purchasing a washer and dryer combo for the property – they’ll thank you.
- Fencing. If your property lacks a fence, it’s wise to build one. It provides privacy and allows the tenant’s children and pets to play in the yard safely without wandering into the back alley or neighbors’ property.
- Storage space: You can garner the attention of many renters by offering generous storage space. Some options to contemplate are adding a walk-in closet, installing extra shelving units, or building a pantry.
- Air Conditioning: Though the winters in Canada can be long and harsh, the country does experience bouts of extreme heat during the summer months. Installing an air conditioning unit in your rental property can make a big difference for tenants who find sweltering heat unbearable.
- Outdoor living space: An outdoor living area, such as a patio, is a desirable amenity for many tenants. It allows them to relax after a long day at work, enjoy a drink with friends, grill a steak on a barbecue, etc.
- Furniture: Including furniture as part of your renovation can be a huge draw for some tenants. Some first-time renters may lack the funds to furnish the rental upon moving in. As a result, they’ll greatly appreciate a rental that offers a couch, dresser, kitchen table, and a few chairs.
Update the cosmetics
If you’re working with a small budget, updating your rental’s cosmetics is an easy way to enhance its look and feel. Even tiny changes can substantially transform your property, adding a modern dash of style and elegance throughout.
Here are some easy fixes that can liven up your property:
- Paint: An excellent place to begin is to apply a fresh coat of paint on your walls and door frames. It’s a cheap investment that requires little effort but yields tremendous value.
- Light fixtures: By installing modern light fixtures, you can brighten up your rooms and make each space feel cozy, sleek, and inviting. There’s a wide range of styles to choose from, and many are reasonably priced.
- Handles and knobs: Adding new hardware to your door knobs, drawers, and cabinet handles are cost-effective improvements that stand out.
- Trim: Add a splash of character to your drab kitchen by installing trim on the cabinets and drawers.
- Baseboards: Damaged baseboards make a property feel aged and cheap, so consider painting them or replacing them entirely.

Chapter 3: Tips, tricks, and hacks for getting the most out of your rental renovation
No matter how extensive your rental renovation is, it’s crucial to employ best practices at every step and explore unique and cunning methods to maximize your investment.
Repair rather than replace
It’s no secret that repairing something is far more cost-effective than replacing it. For this reason, create a list of things in your property that you can rejuvenate by performing DIY repairs.
Of course, it helps to have a flair for handy work. But even if you’re not familiar with home improvement basics, you turn to a helpful YouTube video from an expert showing you step-by-step how to complete a particular procedure. Also, you can refer to your user manuals (you did keep those, right?)
Here are a few DIY repairs that are valuable to know as a landlord:
Troubleshooting appliances: Replacing a malfunctioning appliance or calling a professional to repair it can cost you a bundle. However, in many cases, an appliance breaks down due to a single defective or worn-out component, like a drive belt, thermostat, or fuse. Identifying and replacing the part in question is more financially savvy than purchasing a brand-new appliance.
Fixing simple plumbing issues. Clogged sinks and toilets may seem intimidating at first. However, in many cases, you can straighten out these issues with the aid of a few simple tools and materials. These include pliers, an adjustable wrench, a plunger, thread seal tape, and caulk. To resolve more severe clogs, you may need to obtain an auger (or drain snake).
Patching holes in walls: You save money and increase your walls’ lifespan by personally patching up any gaps. You’ll need a few tools to get the job done, such as drywall mud, a putty knife, and sandpaper. Alternatively, you can purchase an all-in-one drywall repair kit.
Fixing leaky faucets: The constant drip from a leaky faucet can be quite irritating. Luckily, it’s an easy fix in most cases. Typically, as this guide demonstrates, you only need to loosen a handle, remove the old faucet stem, and install a new one.
Maintaining your HVAC system: Should your HVAC system go awry, it can be an immense pain to get it running again – you’ll likely need to call in a professional. However, you minimize any issues through routine maintenance, such as changing the filter and cleaning the refrigerator coils.
Fixing electrical switches and outlets: Do faulty switches and outlets plague your rental? If so, you can often solve these issues by replacing the device or tightening any loose wiring. Just remember to turn off the circuit breaker before you begin!
Be creative – look for unique ways to save time and money
Brainstorming crafty solutions during each stage of rental renovation can help you finish your project sooner and keep more money in your pocket. A little ingenuity can result in some neat hacks, such as this one involving closet doors.
Here are some other nifty tips and tricks to explore:
Standardize as much as possible: Sticking to a choice of style, design, or material can be beneficial both from a financial and logistical perspective. This is especially true if you’ll be renovating multiple rental units simultaneously.
For example, choose the same paint colour for all your rooms to keep things consistent. By doing so, you won’t need to waste time tracking down the exact paint colour once you run out of your initial batch. Plus, you may receive a discount by purchasing the same colour in bulk.
Install a keyless entry system: There are several reasons you should ditch physical keys for a keyless entry system for tenants:
- No need to constantly change locks, doorknobs, and deadbolts when a new tenant moves in
- A keyless entry system is easy to install and maintain – simply set up a new entry code each time a new tenant arrives
- Ability to track who’s entering and exiting your rental
- Better security for tenants
Be strategic and creative with lighting: Buy light fixtures that can accommodate the most common and affordable light bulbs. Alternatively, you can purchase adaptors that will allow you to retain your current installations while using a cheaper bulb.
Perform simple repairs using household items – Sometimes, there’s no need to purchase an entire toolbox to fix a troublesome issue. For example, you may be able to unclog a sink with the help of a plunger, boiling water, baking soda, vinegar, and a wire hanger.

Tenant-proof your rental property
With possibly multiple tenants living in your rental over many years, significant wear and tear on the property is inevitable. For this reason, it’s vital to pay close attention to the materials you choose for your renovation.
First, you should strive to keep your costs low – using pricey and lavish materials is unnecessary to attract quality tenants.
Second, focus on durable, easy-to-repair materials that require little maintenance. The more damage a material can withstand over a long period, the better.
We’ve already discussed how installing luxury vinyl plank over carpet is a no-brainer. Here are some other ways to tenant-proof your rental:
Install tiles on the bathroom floor
Linoleum may seem like the ideal flooring material to use in your rental’s bathroom, as it’s relatively cheap, soft on bare feet, and easy to clean. However, it’s not the ideal material for the following reasons:
- It’s not waterproof
- It may darken if exposed to sunlight for too long
- It’s not as visually appealing as other materials
- It requires hiring a specialist to install it
On the other hand, ceramic or porcelain tiles are more stable and waterproof. Plus, they’re cost-effective, require little maintenance, and look stylish.
Use quartz or laminate for the kitchen countertop
Quartz is arguably the most superior choice for kitchen countertops. It’s tough, heat resistant, impervious to most stains, easy to maintain, and doesn’t require resealing. That being said, the primary downside of quartz is its steep cost compared to other types of countertop materials.
If your primary concern is keeping your costs low, it’s hard to beat laminate. Just be aware that it’s quite vulnerable to burns, warping, chipping, and moisture, so you may need to replace it frequently.
High-quality paint
Durability matters even for a seemingly straightforward aspect of your renovation, like the type of paint you choose. Paint that can withstand scratches, scrapes, and dings is a worthwhile investment.
High gloss paint can absorb a lot of damage and is easy to clean, making it a superb choice for things like cabinets and doors, which your tenants will touch often. Semi-gloss paint works great for areas prone to moisture or grease, such as the kitchen and bathroom. Satin paint is well-suited for high-traffic areas like the living room.
Keep things simple and timeless
It pays to avoid blindly chasing trends and choosing outrageous styles for your rental property. Stick with timeless designs and materials and opt for straightforward patterns and colour schemes. In doing so, you’ll need to do fewer renovations in the future.
Paint the walls a neutral colour
Do your rental walls need a fresh coat of paint? If so, choosing a neutral colour is the most practical and sensible option. Most tenants prefer discreet and subtle colours as they work with various design styles and blend nicely with other colours.
Remember, your tenant will be the one who personalizes the rental unit according to their unique taste, not you. So, be conservative and select a colour that can accommodate as many décor themes as possible.
Avoid outdated designs and styles
Obsessively following design trends isn’t wise – the public is fickle, so trends come and go.
However, ensure you avoid remodelling your rental according to aesthetics that are either outdated or slowly fading away. You risk impairing your property’s resale value and driving away tenants if you do.
Some trends to avoid include:
- Wallpaper
- Popcorn ceiling
- Fast furniture
- Tile countertops
- Wood panelling
- Terrazzo
- White appliances
- Vertical blinds
- Sponge walls
Here are some more trends to steer clear of, along with ones to consider instead


Chapter 4: DIY or hire professionals – which should you choose?
Once you’ve created a concrete renovation plan, the next step is to decide whether you’ll carry out the project on your own or with the help of qualified professionals.
So, which is the best choice – performing the renovation yourself or hiring a general contractor to do it for you?
Here are the benefits of both options:
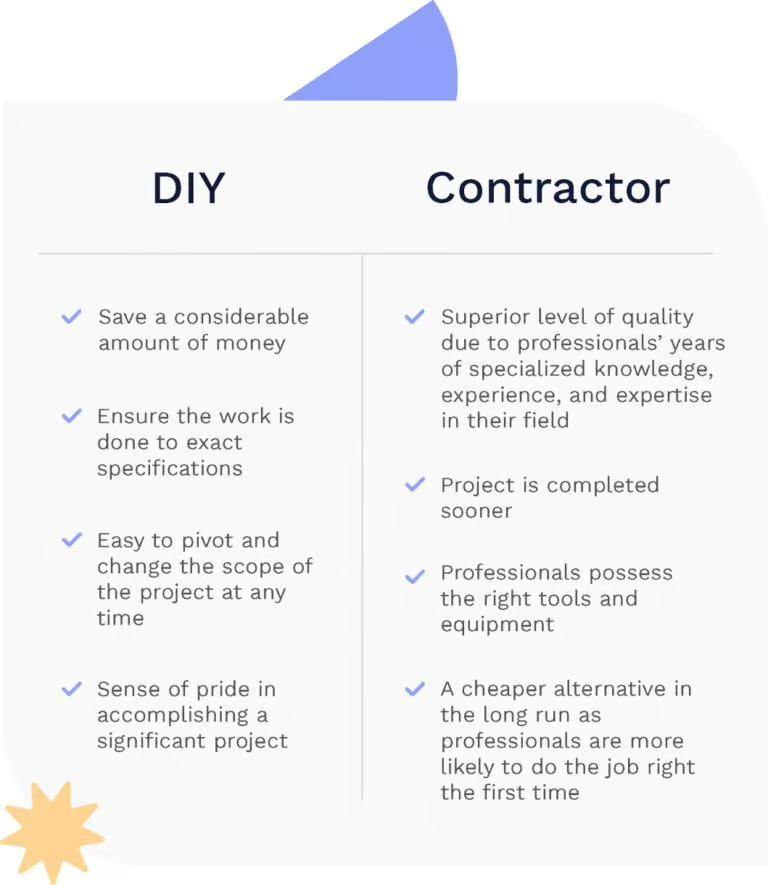
Reasons to hire a general contractor to do the renovation
- You lack time. Many people own rental properties because it’s a reliable way to earn a passive income. They may have a full-time career, family, and other responsibilities that occupy most of their day and aren’t keen on tearing apart floorboards and painting walls. If this describes you, hiring a contractor to do the renovation is worth the extra expense.
- You lack the experience, permits, and licenses. Have you ever completed a home remodelling project before? If picking up a drill fills you with anxiety, it’s best to hand the reins over to a contractor with the necessary skill set, know-how, and tools to bring your vision to life. Many also provide a warranty as part of their services, so you can contact them in the future and have them correct any defects. In addition, if your renovation requires one or more permits, the only way to obtain them may be by working with a certified contractor.
- Your renovation project is extensive and complex. Typically, hiring a contractor for a large-scale renovation is the way to go. This is especially true if you intend to renovate multiple properties at once. An extensive renovation project encompasses many tasks: acquiring permits, hiring subcontractors, ordering materials and supplies, tracking costs, performing inspections, etc. Letting a general contractor take charge, monitor progress, and resolve any issues is usually a wise option.
Reasons to do the renovation yourself
- You have the right skills, tools, and experience. Are you an experienced contractor with all the necessary qualifications and licenses to properly conduct the renovations? If that’s the case, getting your hands dirty and personally bringing your renovation to fruition is worthwhile. Not only will you save a nice sum of money in the process, but the project may be enjoyable and empowering as you watch your vision slowly come to life.
If you need additional help, you can seek reliable professionals on an as-need-basis, such as electricians and plumbers.
- The scope of the renovation is small. Not all rental renovations require hiring a small army of professionals to execute. Assuming that you’re comfortable working with tools and know the basics of home improvement, you can:
- Install light fixtures
- Paint the walls
- Install new hardware for cabinets, doors, and drawers
- Replace the toilet
- Add new shelving units
- Replace the countertop
- You’re working with a tight budget.
Quality doesn’t come cheap. If you wish to hire a reliable and reputable contractor, expect to pay a hefty invoice upon completion of the project.
Suppose you have few financial resources to dedicate to your renovation project. In that case, you may have no choice but to do most of the work yourself.
Whenever you obtain a quote for the estimated project cost, always add another 20 percent on top to account for possible cost overruns.
Understanding contractor quotes
Let’s say you’ve settled on hiring a contractor to renovate your rental. In that case, you’ll need to know how to read and assess a quote, a document issued by the contractor that specifies the work to be done and estimated cost to complete it.
By properly analyzing the quote, you can determine if the price is reasonable, whether you’ll need to scale back the renovation, and better keep track of costs as the project advances.
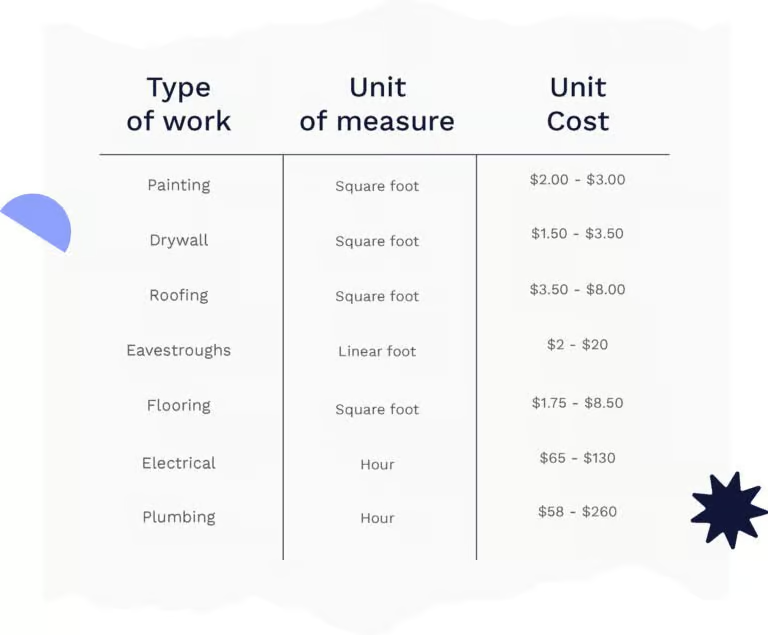
- Know what unit cost is used
Each aspect of a renovation requires work from different trades, all of which account for the cost of materials they use in a particular way. It’s useful to know how they derive their costs so you know if you’re getting a favourable deal.
Here are some standard unit costs to familiarize yourself with:
- Know the quantity of material required for the job
The quantity of a specific material used by the contractor will vary based on the project’s size. However, whatever amount they source for the job should be appropriate, neither too much nor too little. A surplus will result in you overpaying for the job. A shortage will require the contractor to purchase extra material, leaving you to pay more than originally quoted.
Let’s use drywalling as an example. For a drywall job, the contractor will calculate how many square feet to cover with drywall and then determine how many sheets to purchase. Let’s assume a 4’ by 8’ sheet of drywall will cover 48 square feet of area. Therefore, the contractor will determine the total square footage of the surface area and then divide the resulting number by 48 to estimate the amount of material to order.
When it comes to drywall, you can expect up to 20% of waste material. Naturally, the contractor won’t purchase fractions of drywall sheets to match the square footage precisely – they’ll cut standard-sized pieces to make it fit. You can expect excess material from other types of work like painting, flooring, and roofing.
Determining the material required for various jobs is easy with the help of home improvement calculators.
- Know the number of labour hours required
A quote that details the amount and cost of materials is essential. But it’s even more valuable if it includes the labour cost as a separate line item.
Labour costs are often a massive component of the total price you end up paying. So it’s worth knowing how many hours it may take to complete the renovation and the hourly rate. Not all trades list their labour and material costs separately. But it’s information worth asking for, as it will provide you with a baseline to measure costs accurately as the project progresses.

Tips for finding and working with a general contractor
Compare multiple quotes. Never hire the first contractor you find online. Instead, obtain quotes from at least three firms. By doing so, you’ll get a sense of the price range for your specific renovation project and be able to choose the best deal possible. While using Google is a convenient way to find well-established, reputable contractors, be sure to ask for recommendations from family and friends, too.
Conduct proper vetting. Be sure to ask your contractor plenty of questions when you first meet with them. Ask to see their licenses and certifications. Inquire with previous customers about their experience with them. If possible, visit a current worksite to see how organized it appears, and the quality of work done.
Enter into a detailed written agreement. Create a contract with your contractor that outlines the cost of various expenses and the renovation’s expected duration. It should specify a project start date and completion date. That way, you can determine how many months of rent you’ll forego if your tenant must temporarily vacate the property.
Maintain open communication. Always be honest, transparent, and diplomatic when engaging with the contractor and their team to keep the renovation on track and free of bottlenecks. Ensure everyone is aware of the expectations regarding the safety and well-being of nearby residents and tenants.
Our Final Thoughts
There’s an infinite number of ways you can transform your rental property to attract top-notch tenants and give your rental income a boost. Here are the keys steps to follow to complete a successful (and profitable) rental renovation
- Create a plan: Consider the needs of your ideal tenant, craft a budget, determine the size and scope of the project, and list what permits, if any, you’ll need to acquire to ensure your project complies with your city’s regulations.
- Choose which renovations to focus on: Concentrate on areas of your rental that need the most attention and will provide the best return on your investment (kitchen, bathroom, etc.)
- Look for ways to maximize the return on your time and money: Repair everything you can, utilize creative home improvement hacks, choose long-lasting materials, and focus on simple and timeless design styles.
- Decide whether you’ll do the renovation personally or hire a general contractor: If you opt for a contractor, ask them for detailed quotes, assess their references and prior work, and create a solid contract.
By following these steps, you can successfully navigate your rental renovation while avoiding stressful and costly pitfalls.
However, if you wind up with a troublesome tenant, things can still head south. Your renovations won’t amount to much if your tenant suddenly stops paying their rent.
Whether through neglect or blatant carelessness, they may also cause significant damage to your property, which the damage deposit may not cover fully.
And, if you need to evict them, your expenses can skyrocket, as carrying out an eviction can cost a small fortune.
SingleKey’s Rent Guarantee program provides the tools and financial resources to help landlords protect their rental business when faced with a delinquent tenant.
Under the program, you’ll receive payment for up to 12 months of lost rent (up to $60,000 in total), plus reimbursement for property damage (up to $10,000). You’ll also have access to a paralegal team to help you navigate the eviction from start to finish – no tedious paperwork for you!