Cyber Monday: Try the Rent Guarantee and get the 1st MONTH FREE! *Offer ends December 15. Book a call to claim offer or use code CYBER2023

How to: Set Up Rent Collection

Key Takeaways

Whether you come from the old-school of collecting post-dated cheques and storing them in a Ziploc bag, or you use tech-forward solutions like EFTs, we are all done with the hassle of having to call your tenant in front of the teller to fix the $1800 to $1900 on the rental check. Using the SingleKey Rent Collection platform, you can rest assured that accurate, on-time payments will be made directly from your tenant to your bank account.

Published on Nov 28, 2023 | Updated on Nov 28, 2023

Written By:

SingleKey
Author

Get through your rental applications faster

Never miss a rent payment

Stress-free guaranteed renting

Share

Preparing to Sign Up

Before you sign up, have ready:

  • Your bank account details for deposits,
  • Basic tenant information, including name and email address, and
  • Agreed-upon monthly rent

Step 1: Select the Property

Step 1

If you have already entered your property information, click Choose an Existing Property and select an address from the list that appears.

Alternatively, you can Add a New Property to your list by typing in the address and selecting from the drop-down menu that appears. Remember to add the property type and unit number.

Step 2: Provide Monthly Rent Information

To make the payment, we need to know how much rent to collect from the tenant and when. Enter the Monthly Rental Amount in the first textbox. Be sure to exclude any ad hoc, or one-time fees you and your tenant agreed to.

Next, we need to know when to collect from the tenant. The Monthly Payment Date is the date the rent is owed. This can be the 1st or 21st of the month. The rent will be deposited in your account within 1-2 business days.

The rent amount entered will be automatically withdrawn from your tenant’s bank account on the date you select and deposited directly into your bank account. You will receive an e-mail when the payment is complete.

Step 3: Identify the Collection Period

The next step is to set up the first and last date of rent collection. Select the first month to begin collecting rent. Remember to exclude any months for which a deposit was already collected. The dates entered can differ from the duration of your rental agreement. For instance, if you are mid-lease you can set the start date to the next month for which rent is due.

You can collect payments from your tenant as long as they continue to live in your unit. Automated rent collection will continue until you log in and modify the service. You may also select the month in which to stop collecting rent from your tenant if you are certain they will move out by a specified date.

You may cancel rent collection services at any time by logging into your account. In case you get busy, we will also follow up with you in a few months to check on your lease.

Step 4: Select your Tenant

Step 4

If you’ve run a SingleKey Tenant Credit Report, click on Choose an Existing Tenant and select the correct tenant from the menu. For tenants not on our list, enter the required information so we may contact them directly. We will immediately send out an email requesting the tenant’s permission to collect rent.

A question we often receive is whether we can set up multiple tenants on the same lease. At this point in time, we only offer the ability to collect rent from one tenant per lease. It is best practice to only have one person on the lease responsible for paying rent in full.

Who is the tenant responsible for rent payments?

Step 5: Provide Banking Information

Step 5

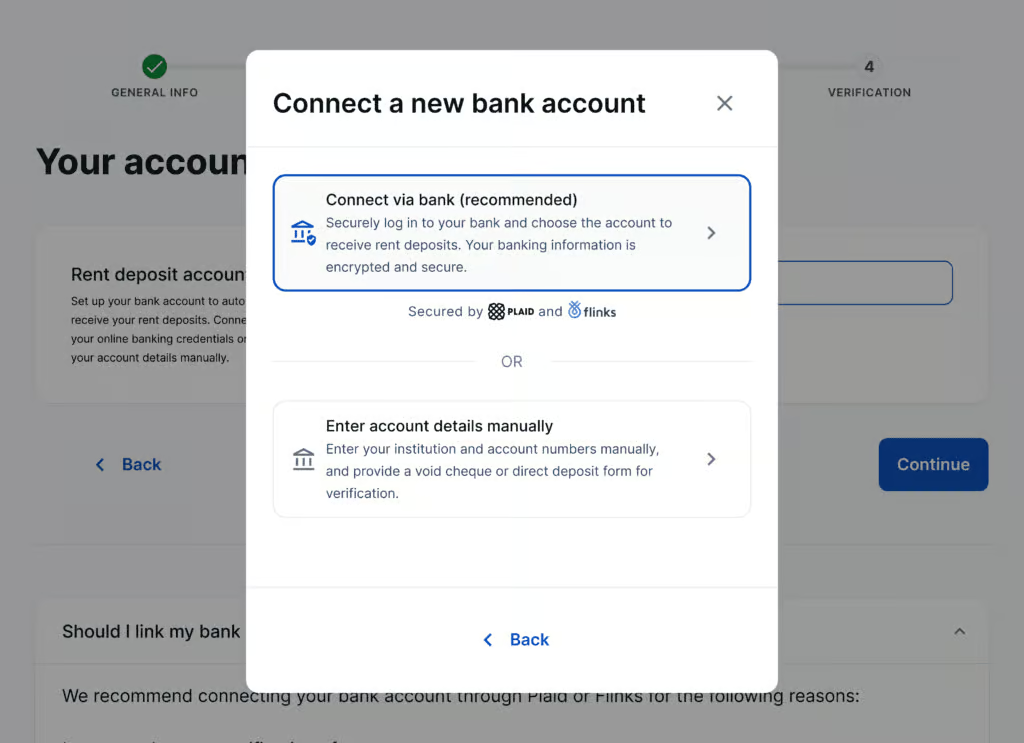
Whether you choose to link your bank account or provide checking account information, we can still help you collect your rent!

Click “Link my Bank Account” to follow the linking process.

Alternatively, you can enter your banking information.

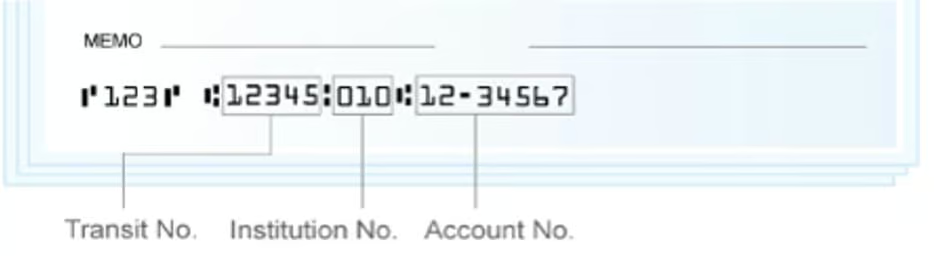
  • Using your online bank account, you’ll find your account number details on the “My Accounts” screen. The first five digits are the transit number and the last 7 digits are the account number. If you are set up to receive eStatements, you’ll find your account number at the top of each statement.
  • If you have a copy of a void cheque handy, you can input the transit number, institution number, and account number by using the following reference photo:
Banking information

We also require you to upload a scanned copy of the voided check, or a direct deposit slip to support our records verifications process.

Where should rent be deposited

Step 6: Verify your Identity

To comply with Canadian payment regulations, we are required to verify the identity of our users to prevent any fraudulent activities.

Please provide a few personal details to confirm your identity

Final Step: Watch for your Rental Payments

Within five minutes, you were able to do away with visits to the bank, calls to tenants requesting new checks, and misplacing that Ziploc bag! We also hope this has made the journey easier for your tenants and gets your relationship off to a smooth start!

Don’t hesitate to get in touch with SingleKey. Give us a call at 1-877-978-1404 or email us at info@singlekey.com. You may also fill out the form on our Contact Us page!

Learn more about Rent Collection

Table of contents

Share

Daily poll

Table of contents